2014 | C Programming and Computer Geeks

Search MY Blog

Saturday 9 August 2014

Recovering deleted files on Windows PC

What happens when we delete the files or folder in our PC/Laptop ?

When a file or folder is deleted from your computer, its contents are not immediately destroyed or deleted permanently. Windows simply marks the hard drive space as being available for use by changing one character in the file table. If you manage to start an undelete/Recover process before Windows overwrites that part of hard disk with new files. You can set that flag back to "on" and get your files back.
 
Data Recovery
Data Recovery

How to recover deleted data?
As I know, you can download some free recovery software as follow to recover deleted files.

NoteStop using the current disk as main disk, please keep it unchangeable before recovering the files in your System/PC.

Pandora Recovery actually recovers files permanently removed from Recycle Bin, files originally deleted using Shift + Delete keys bypassing Recycle Bin and files deleted from DOS prompt. Pandora Recovery allows you to find and recover recoverable deleted files from NTFS-formatted volumes, regardless of their type - you can recover pictures, songs, movies or documents. For more information, please visit the following link.

Find some other tools listed below for recovering the deleted data on your Windows System:


Lets start Recovery........... 


Monday 21 April 2014

How to find the depth of a binary tree


Depth of a binary tree:
Depth of a binary tree is the maximum length of all paths. Nodes from the root to a leaf form a path.
For example, the depth of the binary tree in the below figure is 4, with the longest path through nodes 1, 2, 5, and 7.
Binary Tree Depth
A binary Tree with depth 4

Solution: Depth of a binary tree is the length of the longest path.
If a binary tree has only one node, its depth is 1. If the root node of a binary tree has only a left sub-tree, its depth is the depth of the left sub-tree plus 1(root node). Similarly, its depth is the depth of the right sub-tree plus 1(root node) if the root node has only a right sub-tree. What if the root node has both left sub-tree and right sub-tree? It is the greater/max value of the depth of the left and right sub-trees plus 1(root node).

 For example, the root node of the binary tree in the above figure has both left and right sub-trees. The depth of the left sub-tree rooted at node 2 is 3, and the depth of the right sub-tree rooted at node 3 is 2, so the depth of the whole binary tree is 4; 1 plus the greater value of 3 and 2.

 It is easy to implement this solution recursively, with little modification on the post-order traversal
algorithm, as shown below:

int TreeDepth(Binarytree Node* pRoot)
{
   int nLeft, nRight;
   if(root == NULL)
        return 0;
    nLeft = TreeDepth(pRoot->pLeft);
    nRight = TreeDepth(pRoot->pRight);
    return (nLeft > nRight) ? (nLeft + 1) : (nRight + 1);

}

Tuesday 15 April 2014

Pointer to array and Array of Pointers


Pointers and Arrays
Pointers and Arrays
What Is the difference between the following three declarations?

int *ptr1[5];
int  (*ptr2)[5];
int* (ptr3[5]);


Answer:
int *ptr1[5];
   Here in int *ptr1[5], ptr1 is an array of 5 integer pointers (An array of int pointers).

int  (*ptr2)[5];
   And in int (*ptr2)[5], ptr2 is a pointer to an array of 5 integers (A pointer to an array of integers).

int* (ptr3[5]);
   This is same as ptr1 (An array of int pointers).


What will be the Output of the below program?

void main(void)
{
     int arr1[4] = {1, 3, 5, 7};
     int arr2[4] = {2, 4, 6, 8};

     int (*ptr[2])[4] = {arr1, &arr2};
    
     printf("%d, %d", (*ptr[1])[2], *(**(ptr) + 3));

}

Try to explain (*ptr[1])[2] And *(**(ptr) + 3) expressions and outputs by step by step..
Learning Points: Pointers to array/Array of pointers and resolving pointer expressions.

Program Explanation:
int (*ptr[2])[4] = {arr1, &arr2};
Here ptr is a array of 2 pointers,In which each pointing to an array of 4 integers.
from the above C statement this ptr is assigned as {arr1,&arr2}.
Here arr1 is a base address to array arr1 also called pointer to the first element of array.
And &arr2 is an address of array(arr2) also called entire array address).
ptr array elements(ptr[0],ptr[1]) expects the address of type int(*)[4]. But ptr[0] is assigned arr1,which is of type int*.
So this is the flaw in code. This may not lead to any compilation error, but it gives warning.
Even though you have given base address(arr1) to ptr[0], it will considers it as pointer to an array of 4 int (array address or entire array address).

printf("%d, %d", (*ptr[1])[2], *(**(ptr) + 3));
From the above C Statement

( *ptr[1] )[2]:
( *ptr[1] )[2] ==> (* ( ptr[1] ) ) [2]  ==> (* ( &arr2 ) ) [2] ==> ( arr2 ) [2] ==> arr2[2] ==> which equals the value 6

*(**(ptr) + 3):
**(ptr) ==> *(*ptr) ==> *(&arr1) ==>arr1(base address) 
Now

*(**(ptr) + 3) ==> *( arr1 + 3) ==> Nothing but arr1[3] ==> which equal to the value 7

Output:
6, 7

Please Correct me if anything is wrong. Please share your inputs and suggestions in comments.
Find more on C Pointer Concepts Here


Monday 3 February 2014

How to make our Windows Genuine


How to make our Windows Genuine?
After a period of time(trail versions) many of the windows 7 OS users will face an error that "Window 7 is not genuine". If our windows OS is not a genuine version, it will not allow us to change the background screen and irritates us very often. This "Window 7 is not genuine" error message will come if we are using pirated or OEM versions of Windows 7.

Genuine Windows 7 OS
Genuine OS
Windows 7 Not Genuine Error in your PC

          Genuine OS issue in PC

For rectifying this error, do the follow the below steps and make your windows 7 as Genuine.

1st Method
Note: Before running the below steps make sure you are running windows as administrator

1) Start à all programs à accessories à command prompt
OR
Key combination of Windows button + R and type cmd à Enter

2) In command prompt type SLMGR /REARM and hit Enter.

SLMGR /REARM will re-set the rearm counter and you can reset your rearm count how many times you want.so you will have windows 7 running forever in trial mode.

3) One window will be opened like showed in the below figure and Press Ok.

Genuine Windows 7 OS
Genuine Windows OS


4) Reboot the system and your Windows will work normally without any Genuine OS Problems(Note: For some systems you may need to reboot 2 times for avoiding the Popup window of Genuine OS problem.)


2nd Method

Sometimes many of us face the Windows OS Genuine version problem. To rectify this problem/issue, do the following steps and make your Windows OS as Genuine.

1) Copy and Paste the following code in the notepad.

Windows Registry Editor Version 5.00
[HKEY_LOCAL_MACHINE\SOFTWARE\Microsoft\Windows NT\CurrentVersion\WPAEvents]
"OOBETimer"=hex:ff,d5,71,d6,8b,6a,8d,6f,d5,33, 93,fd
"LastWPAEventLogged"=hex:d5,07,05,00,06,00,07,00,0f,00,38,00,24,00,fd,02
[HKEY_LOCAL_MACHINE\SOFTWARE\Microsoft\Windows NT\CurrentVersion]
"CurrentBuild"="1.511.1 () (Obsoletedata - do not use)"
"InstallDate"=dword:427cdd95
"ProductId"="69831-640-1780577-45389"

"DigitalProductId"=hex:a4,00,00,00,03,00,00,00,36,39,38,33,31,2d,36,34,30,2d,\
31,37,38,30,35,37,37,2d,34,35,33,38,39,00,5a,00,00,00,41,32,32,2d,30,30,30,\
30,31,00,00,00,00,00,00,00,00,0d,04,89,b2,15,1b,c4,ee,62,4f,e6,64,6f,01,00,\
00,00,00,00,27,ed,85,43,a2,20,01,00,00,00,00,00,00,00,00,00,00,00,00,00,00,\
00,00,00,00,00,00,00,00,00,00,00,31,34,35,30,34,00,00,00,00,00,00,00,ce,0e,\
00,00,12,42,15,a0,00,08,00,00,87,01,00,00,00,00,00,00,00,00,00,00,00,00,00,\
00,00,00,00,00,00,00,00,00,00,00,00,00,00,00,00,00,94,a2,b3,ac
"LicenseInfo"=hex:9e,bf,09,d0,3a,76,a5,27,bb,f2,da,88,58,ce,58,e9,05,6b,0b,82,\
c3,74,ab,42,0d,fb,ee,c3,ea,57,d0,9d,67,a5,3d,6e,42,0d,60,c0,1a,70,24,46,16,\
0a,0a,ce,0d,b8,27,4a,46,53,f3,17

2) Save this notepad file with the .reg extension.

3) Now double click or run the file. It will ask you the confirmation to add the value to registry.

4) Then press yes.

5) Reboot your System.

6) Start Downloading from Microsoft Site.


If you liked the above post then don’t forget to share & comment...

Monday 27 January 2014

Slack Byte and Structure padding in Structures


What is Slack Byte or structure padding in Structure?

CPU/Computer stores structures using the concept of "word boundary".
What is word boundary?
Word boundary is the size of word(bytes) that CPU can process(read/write) at a time. Usually it is the Accumulator size of a processor(CPU). The size of word boundary is machine dependent.

Slack Byte(Padding byte)
In computer with 4 bytes word boundary, the members of structure are stores left aligned on the wordboundary, as shown below. A character data takes one byte and an integer takes 4 bytes. 3 bytes(Padding bytes) between them is left unoccupied. This unoccupied byte is known as the slack byte.

Structure padding
Structure Padding or Slack bytes


Why Padding or slack bytes are required?
Slack byte used for speed optimization. It aligns bytes so that, that can be read/write from structure faster. It is an extra byte, sometimes placed between structure members to align the structure.
Some Platforms like x86, CPU can access data aligned on absolutely any boundary, not only on "word boundary". The mis-aligned access might be less efficient than aligned access. If data is aligned properly, CPU can access the memory(structure members) efficiently and faster.

Note: As far as CPU is concerned, it can access any data on any boundary.

When we declare structure variables, each one of them may contain the slack bytes and the values stored in such slack bytes are undefined(garbage). Due to this, even though the members of two variable values are equal, their structures do not necessarily to be equal. Therefore C does not permit compassion of structures. However, we need to design our own function that can compare the individual members of structure to decide whether the structures are equal or not.

For understanding more, run the below program and check for memory mapping of the structure variable.

#include "stdio.h"
void main()
{
  struct st_demo
   {
char ch;
int i;
   };

  struct st_demo s;

  printf(" Size of int    = %d \n\n Size of char   = %d \n\n Size of struct = %d ",sizeof(s.i), sizeof(s.ch),sizeof(s));
 
  getch();

}

Let assume the size of char is 1 byte and int is 4 bytes(Variable sizes depends on Platforms/Compilers).
According to this, the size of structure variable s should be 5(1+4) bytes.

Slack byte in structures
Output of the demo program
But from the above programs Output, Size of struct is 8 bytes.

So from where we got this extra 3 bytes?
From the memory map we can observe that there are three bytes between variable is unoccupied. These bytes are called slack bytes.

Note: It is not always necessary that a structure variable contains structure padding or slack bytes. 
If anything needs to be added for the above article, Please post it in comment section.


If you liked the above post then don’t forget to share & comment...


Monday 20 January 2014

Simple Virus Creation in Windows Systems


What is Computer virus?
Nowadays everybody aware of computer virus.
Computer viruses are small software programs that are designed to interfere with computer operation.

Today we will create a small and funny virus, which will reboots the computer.
virus creation with Internet explorer
Computer Virus
Funny Internet explorer virus creation
Whenever we double click on Internet explorer Computer will be restarted. For creating such virus follow the below steps.

1. Go to Desktop

2. Right click > new > Shortcut

3. In “Type the Location of the item” > write: “C:\WINDOWS\system32\shutdown.exe -r -t 00″ without double quotes.

4. Click next and in “Type a name for this shortcut” write ”Internet Explorer” and click Finish.

5. Now Right Click on the shortcut of Internet Explorer and go to “Change Icon” and select the icon of Internet Explorer.


6. Now the virus is ready. Whenever you double click on Internet Explorer Shortcut, Computer will restart.

Note: Same method can be used for any program(like Internet explorer) for creating the virus by changing the name and icon in steps 4 and 5).

Please share, if you likes this post.


Thursday 16 January 2014

Make your computer Speak


Make your computer speak whatever you input to it.
It looks interesting that, if anybody tells that they will make your computer to speak whatever they write or inputs.
Make your computer speak whatever you input
Make your Computer Speak
To create one such talk script, follow the steps given below:-

Step 1.
 Open Notepad.

Step 2.
 Copy and paste the exact code given below:

     Dim Message, Speak
     Message=InputBox("Enter text and visit http://www.neentech.blogspot.com ","Speak")
     Set Speak=CreateObject("sapi.spvoice")
     Speak.Speak Message


Step 3.
Click on File menu, save As, select All Types in Save as Speak.vbs or "*.vbs"(replace * with your own name.).

Step 4.
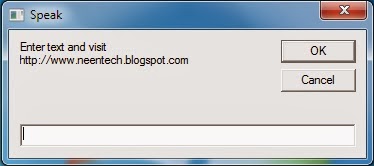
Double click on the saved file, then a window will open,like showned in the below figure.
Enter text for computer to speak
Enter text for Computer to speak
Enter some text in enter text column and click OK.

Now your Computer will speak / talk what you typed in step 4.

Windows Compatibility: This VBS file can be executed on all versions of Windows.


Please share it, if you likes the trick.

Tuesday 14 January 2014

Multiple Sites In a Single Click


How to open multiple sites In a Single Click ???

Hi.. today I will show you some interesting stuff related to opening multiple websites in a single click.

Multiple sites in a single click
Multiple Sites
Do follow these simple steps.

1. Open Notepad.
2. Copy Below Given Code And Paste It In Notepad.

@echo off
start 
www.neentech.blogspot.com
start 
http://www.youtube.com/watch?v=pArdrXM5qLM

3. Now save Notepad As Sites.bat
4. Now open your saved file. It will open three websites in a single click.
5. You can also add more sites by writing Start followed by websites..
Even you can replace the above sites with other websites and play around.


Hope you likes this post. Please share this post with all your friends.

Thursday 9 January 2014

Hidden secrets of Android phone


Android hidden codes
Nowadays everywhere we can find the Android phones around us. Android is one of the most famous OS for mobiles. We can find lot more useful apps and tools in it. And Along with that we have lot more hidden tools, secrets and information in Android phones.

Here I have listed some of the useful codes.
 
Secret Codes of Android
Android Secrets

1. COMPLETE INFORMATION ABOUT THE PHONE
*#*#4636#*#* 
à [Displays Phone Information, Battery Information, Battery History and Usage Statistics].

2. FACTORY DATA RESET
*#*#7780#*#* 
à [Displays Google account settings, System & application data settings, Downloaded applications, etc...]
Note: This code will not remove current system softwares and applications, and SD card files.

3. FORMATTING ANDROID PHONE or DEVICE
*2767*3855# 
à [It will remove all files and settings including the internal memory storage, and also re-install phone firmware.]
Note: Once you dialed this code, there is no way to cancel this without removing your battery quickly. So think twice before putting this code.

4. UPDATES PHONE CAMERA
*#*#34971539#*#* 
à [ This Updates camera firmware in image, Update camera firmware in SD card, Displays camera firmware version, Get firmware update count ]

5. SERVICE MODE
*#*#197328640#*#* 
à [This code is used to enter into Service Mode, You can run various tests and change settings in the service mode]

6. CREATING BACKUP
*#*#273283*255*663282*#*#* 
à [This code opens a file copy screen where you can back up your media files. Eg: Images, Sounds & Videos]

7. LAUNCH VARIOUS TESTS CODES
*#*#0*#*#*   
à [LCD Test]
*#*#3264#*#* 
à [Version of RAM]
*#*#2663#*#* 
à [Version of Touch Screen]
*#*#0842#*#* 
à [Vibration and Back-light Test]
*#*#2664#*#* 
à [Touch Screen Test]
*#*#0588#*#* 
à [Sensor Test]

8. GET FIRMWARE VERSION INFORMATION
*#*#4986*2650468#*#* 
à [ Phone, H/W, RF Baseband ]
*#*#2222#*#*         
à [ FTA HW-Version ]
*#*#44336#*#*        à [ Phone, CSC, Build Time, Change List Number ]
*#*#1111#*#*         à [  FTA SW Version ]
*#*#1234#*#*         
à [  PDA & Phone ]

9. GPS, WLAN & BLUETOOTH TEST CODES
*#*#232339#*#* [OR] *#*#526#*#* [OR]  *#*#528#*#* ( WI-FI Test )
*#*#232338#*#*  
à [ Display WI-FI Mac Address ]
*#*#1472365#*#* 
à [  GPS Test ]
*#*#232331#*#*  
à [  Bluetooth Test ]
*#*#232337#*#*  
à [  Display Bluetooth Device Address ]


Please share in comment section,if i have missed any codes.

Search This Blog